Thursday, June 4, 2009
Wednesday, June 3, 2009
Monday, June 1, 2009
Xanita 1:1 Mock Up
Building my chair out of Xanita was a big learning curve, I thought while I was designing and while I built the mock up out of thin board than most things I had compensated for, like the thickness of the 10mm Xanita. But of course that didn't turn out to be true and so some major modifications had to be made, mostly to do with joining and supports.
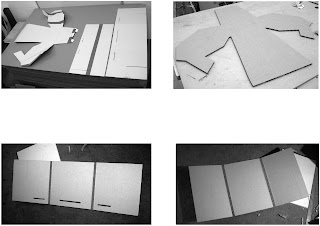
These images show the first stages of the xanita mock up, the first image shows how much the model will use of the complete xanita which was 1830X1220mm. The rest of the images are just the cut outs of the top section and the two base/leg components.
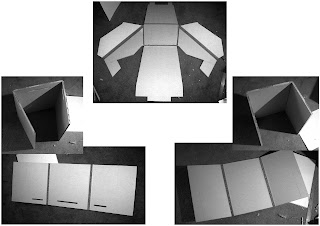
These show the pieces in the previous images with the bend folds and cutouts in place. I used the hairdryer at home to peel the top layer off for the bend folds.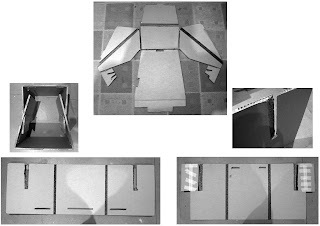
After putting the chair together, I needed to make some modifications to the locking system and so I made cuts on the main body so that the legs could slot into the top. If you look in the top image the new slots have been put in the little square bits at the bottom of the arms. In the bottom right image you can see the parts that I have extended with masking tape, these parts are whats locks into those little square sections so they don't pop out the side when the chair is in use.
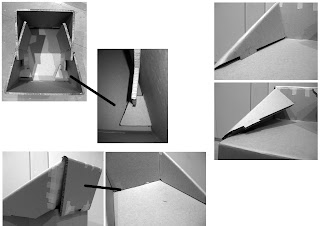
These show some further detailing on the modifications I had to make, the top left photos show the new locking system I described earlier with the little square parts on the arms and the extension on the leg component. The right images show the problems I was having with the arms, originally they were to fold under the seat and lock with the legs but this wasn't going to work, instead I chose to just lock them in the top. I cut out rectangles for the tabs to slot into but they repeatedly popped out, this lead to the modification in the bottom left photos, I was to have the backrest lock into the back, which worked but I chose to flip it to the front and lock it in there, this solved the problem of the arms popping out and kept it quite rigid.
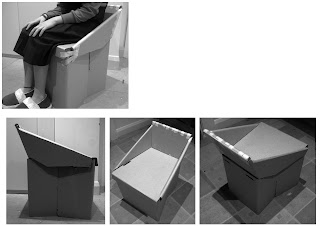
And this is my final Xanita mock up, it still holds true to the original shape even with the problems that needed to be addressed. The seat comfortably holds my weight, so should be able to hold the 150kg and it doesn't take to long to put together, hopefully the final model works out.

These images show the first stages of the xanita mock up, the first image shows how much the model will use of the complete xanita which was 1830X1220mm. The rest of the images are just the cut outs of the top section and the two base/leg components.

These show the pieces in the previous images with the bend folds and cutouts in place. I used the hairdryer at home to peel the top layer off for the bend folds.

After putting the chair together, I needed to make some modifications to the locking system and so I made cuts on the main body so that the legs could slot into the top. If you look in the top image the new slots have been put in the little square bits at the bottom of the arms. In the bottom right image you can see the parts that I have extended with masking tape, these parts are whats locks into those little square sections so they don't pop out the side when the chair is in use.

These show some further detailing on the modifications I had to make, the top left photos show the new locking system I described earlier with the little square parts on the arms and the extension on the leg component. The right images show the problems I was having with the arms, originally they were to fold under the seat and lock with the legs but this wasn't going to work, instead I chose to just lock them in the top. I cut out rectangles for the tabs to slot into but they repeatedly popped out, this lead to the modification in the bottom left photos, I was to have the backrest lock into the back, which worked but I chose to flip it to the front and lock it in there, this solved the problem of the arms popping out and kept it quite rigid.

And this is my final Xanita mock up, it still holds true to the original shape even with the problems that needed to be addressed. The seat comfortably holds my weight, so should be able to hold the 150kg and it doesn't take to long to put together, hopefully the final model works out.
Wednesday, May 20, 2009
Chosen Design 'Modified' 1:1 Mockup
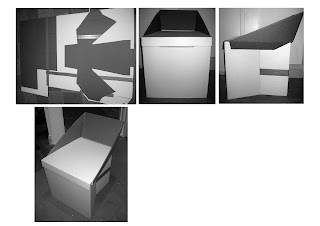
After completing last weeks 1:1 mockup, it was clear that the chair could still do with some modifying. So out came the stanley knife, pieces were cut off and new folds were made. I knew the new direction I wanted to head in so I made another mockup, as you can see above, the general form still holds true to the original idea but I shortened the backrest, folded over the armrests to create a cleaner look and also enhanced the bottom section so that it was structurally more stable.
Tuesday, May 12, 2009
Chosen Design 1:1 Mock-up
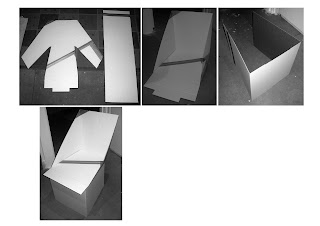
After a few modifications to the overall design, it was time to create a 1:1 mock-up out of cardboard. The above shows a glimpse of the process, the first image shows the cutouts I made from the cardboard sheets that I duck taped together to create a 1830x1220mm sheet. The second image shows the top section of the chair folded up and in its final state. The third image shows the base of the chair and lastly an image showing the top and bottom sections brought together in unison to create the final form.
Wednesday, May 6, 2009
Model Trial 04
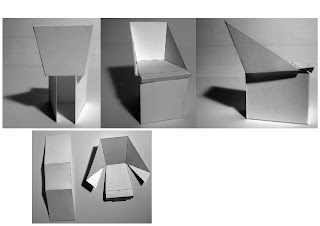
After going over the previous model it was clear that some changes had to be made, so I continued with some quick sketches and came to this design. It consists of two parts, the base/legs and the top/seat area. The arm supports tuck under the seat and once produced in xanita will intersect and lock in with the base after I have cut channels for them to sit in. The front of the chair will also fold over and slot into the front of the legs to give a cleaner look to the front of the chair.
Subscribe to:
Comments (Atom)

